
Starting anew on a different ad network provider will always be a chore. While services such as Ezoic try to make that transition as streamlined and as effortless as possible, there’s always a chance that some glitch or seemingly minute misconfiguration throws a wrench into the works. Among them are the Ezoic origin error issues, which you may encounter during the initial integration process.
So, here’s how we’ll solve that…
What Is An Ezoic Origin Error?
As the name might imply, this is what happens when your origin server isn’t providing the website to Ezoic’s servers. It’s worth refreshing ourselves on how that works. In essence, Ezoic serves as a proxy that sits between your website and your site’s visitors. When a user loads up your site, it’ll request your site via Ezoic, if Ezoic can’t speak seamlessly with your own server, you will have origin issues.
Ezoic’s version of your website has ad banners and placeholders for monetization, but beyond this, it still remains the same. In so doing, you have to make sure that the connection between your website and Ezoic’s proxy server is uninterrupted. Otherwise, if your site’s origin server fails to pass along the site traffic to Ezoic’s proxies, an ‘origin error’ message will appear, and your site may fail to load.
There are a couple of possible reasons why it occurs (among many others):

- Your website is down on the host-end (basically, something’s off on your side). This is a fairly typical reason why you might be experiencing an Ezoic origin error problem.
- Or, the host itself has blocked traffic from flowing toward Ezoic and its proxy servers. You may see this if you’re setting Ezoic up for the first time.
Regarding the latter, when you’ve turned on Ezoic’s monetization and have integrated your site to it, the origin server will instead see that all of your site’s traffic is coming from a selection of Ezoic IP addresses. That is rather than seeing a bunch of requests from various IP addresses from individual users. Thus, your host may falsely flag this traffic as if it’s coming from bots, and prevents Ezoic from accessing it.
Ezoic Origin Error Video Overview and Solution

What Does An Ezoic Origin Error Look Like?
When an origin error fault occurs, your website would either fail to load completely. Or, take quite a long time just to show up. Worse, this can even impact what you’re doing on the backend of the site, such as logging into WordPress or working on a page. There are a few ways that an origin error may manifest itself. Here’s how you can tell that your site is plagued by an Ezoic origin error issue:
- The website takes a long time to load, or won’t load at all. Otherwise, your connection may be timed out.
- An ‘origin error’ message would appear in the top-left corner of your website. Alternatively, you may also see an ‘Error Communicating With Origin’ message, instead.
- You’d be asked to solve a CAPTCHA before eventually, the site may or may not load thereafter.
- You may see various other error messages, like a ‘500’ error, ‘520’ error, ‘403 Forbidden’ error, ‘401’ error, ‘503’ error, ‘404’ error, or ‘301 Redirect’ error.
There are some ways that you can try to narrow down what’s actually caused this origin error issue to appear. Mainly, you can try to refer to the exact numerical error messages that you’re getting:
- 401 Error – Your host has spotted that your IP address and site traffic has been used (technically, it’s an incorrect classification) by bots.
- 503 Error – This tells you that requests are constantly being timed out as it’s trying to connect Ezoic with your host server.
- 404 Or 301 Redirect Error – Either one is an indicator that there’s most likely an issue with your host and not Ezoic. Therefore, it’s better to try and troubleshoot this with your host provider, not Ezoic.
What Are The Solutions For An Ezoic Origin Error?
As we’ve mentioned thus far, the most likely cause of why you’re seeing an Ezoic origin error issue is a misconfiguration with the host. It’s probable that it saw Ezoic’s traffic as a bot, rather than behaving as an advertising network should. Regardless of what the underlying cause might be, there are certain steps that you can take to solve it. Here’s a step-by-step guide on how and where to get started:

1. Turn off Cloudflare Bot Fight Mode & Whitelist Ezoic IPs
You can thank me later. But in most scenarios, this will resolve the origin error issue that you are experiencing. This can be done by going to security – Bots – Bot Fight Mode – Set to disable.

Cloudflare Bot Fight Mode – Disable it
I would also recommend that you whitelist all of Ezoic’s IP addresses via Cloudflare. You can see in the screenshot below the level of activity that can come from Ezoic’s servers within 24 hours period.

You will need to retrieve the full list of Ezoic server IP addresses from the bottom of this support page then complete the following steps in Cloudflare:
- Log in to Cloudflare and find your domain.
- Select security.
- Select WAF.
- Add a firewall rule and give it a name e.g Ezoic Whitelist.
- Create the rule Field = IP Source Address, Operator = Is in List, Value = Select a list of Ezoic IPs Address.
- You can create or update the list where is says manage lists.
- Then configure Choose an Action = Allow.
All comms will now be allowed with no firewall limitations.

If you turn off CF bot fight mode and whitelist all of Ezoic’s IPs then the two services will work very well together and not block each other from communicating.
I would recommend doing the above before you integrate with Ezoic as you might find this stops you from integrating in the first place.
2. Check Your DNS Records And SSL Settings
Double-check your site’s DNS records and SSL settings. So, inspect to make sure that the DNS records and SSL settings on both your site (specifically, the origin server) and Ezoic’s proxy servers match up. This is especially important if you’ve just moved hosts or have switched over to a new server. In so doing, the origin server’s IP address will have changed.
If that’s so, you’ll have to copy over the origin server’s IP address and edit your Ezoic settings just to ensure that Ezoic is pointing the right way. While you’re there, inspect everything else to make sure that your origin servers and Ezoic’s proxy servers are linked to one another. Whether your website is linked via nameservers or through Cloudflare, the settings need to reflect on Ezoic’s side, as well.

Within Cloudflare’s settings page, there are a few other options that you should look into or consider changing. These might help to resolve the origin error issue:
- Turn off Automatic HTTPS Redirect (this is turned on by default, which can cause that origin error issue to appear)
- Change the SLL Type option to Flexible (or you can leave it at Full if the origin error issue’s already fixed).
3. Look Through Any Security Plugins – WordFence
If updating (or just confirming) the DNS records and SSL settings did nothing, the most likely issue is that either the host or a security plugin on your site is falsely flagging Ezoic’s IP address as a bot. On that note, you’ll have to reconfigure them so that Ezoic’s IP address is whitelisted. For example, let’s say you use WordFence to add a layer of security around your WordPress site.
In that case, whitelisting an IP address is pretty simple:
- Log in and open up the WordPress admin page for your website.
- On the left-hand side menu bar, hover your cursor over WordFence, and find the Firewall option.
- Within the Firewall options page, find a setting called All Firewall Options (it has a gear icon).
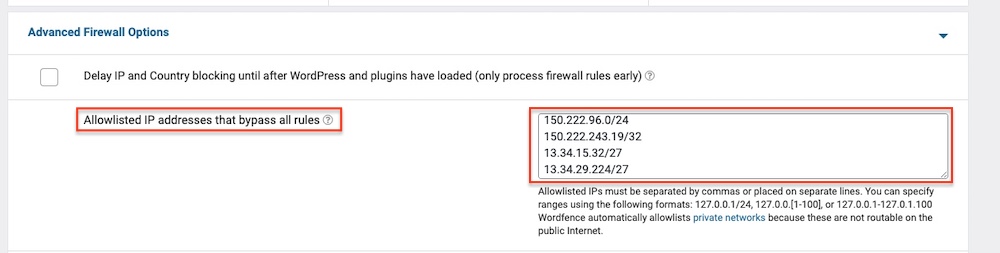
- That’ll open a new page, there should be a box that says “Whitelisted IP addresses that bypass all rules”.
- Here, you can manually copy in IP addresses to have them be whitelisted from WordFence’s firewall.
- Specifically for Ezoic, their support page has a huge list of IP ranges that you’ll have to whitelist. Refer to this site here, and copy every Ezoic-based IP range into that WordFence whitelist box. Here is the IP list.
- Click on Save Changes in the WordFence Firewall options menu to save it.
Wordfence Whitelist IP Addresses
The steps are generally pretty similar, no matter what security plugin you’re using. Most of the time, these IP whitelisting options can be found in their respective firewall settings. Once again, just copy over the entire Ezoic IP address range into whatever whitelisting input box they have. Then, save it, and clear out your website’s cache. If this still doesn’t work, it may be an issue with your host.
4. Contact Your Host
While the security plugin may now be whitelisting Ezoic’s traffic requests, your host might still flag it falsely as bot traffic. If you’re not using a VPS and are hosting your website elsewhere, a call or chatter with your host is otherwise necessary. Usually, seeing a 403 Access Forbidden, 520, or origin error message is a tell-tale sign that your host is blocking traffic from heading over to Ezoic.
If that’s so, you’ll have to drop an email to your host and request to have Ezoic’s IP address range whitelisted. Just like re-setting your security plugins, refer to Ezoic’s list of IP ranges, and send it over to your host. It’s crucial that they whitelist all of these IP addresses and authorize them to request all traffic from your site, as blocking just one or a few can still cause that origin error issue to reappear.
5. Install An X-Forwarded-For Header Tool
If the underlying issue is your host not being able to properly authenticate your users’ IP addresses to check that they’re not a bot, then why not just give them those addresses? This is one solution that an X-Forwarded-For header tool can solve. What it does is simply allowing that the IP addresses of your individual site visitors can be sent through a proxy network. The latter also includes services like Ezoic.
All you need to do is install this header onto your origin server. Then, let the host know that they need to authenticate traffic requests based on inflows from the X-Forwarded-For header. If you’re a bit less inclined to set this all up yourself, you may even ask your host to do it for you. Here’s a step-by-step guide on how to integrate an X-Forwarded-For header tool, according to Ezoic:
- First, it’s a good idea to make a backup of your website. There are loads of tools (like phpMyAdmin or Updraft Plus) that can make this process easier for you. If anything goes wrong later, you should be able to have your site restored in a pinch.
- Now, you’ll need to find a file on your website that every single page can access. Often, these can be files such as header.php, init.php, or config.php, depending on how your site’s been set up.
- This file is where we’ll be inserting the X-Forwarded-For (XFF) code. In either of the aforementioned PHP files, you should see a line of text that says: $_SERVER[‘REMOTE_ADDR’]
- What you can do now is replace that string of text with: $_SERVER[‘HTTP_X_FORWARDED_FOR’]
5. Add An X-Forwarded-For Code To WordPress
Although, this process will vary if you’re using a WordPress website. For this, you’ll need to find the wp-config.php file, which should be accessible in the WordPress root folder. Open it up, then copy and paste the code that we’ve written down below, word for word. As to where you need to copy those codes into the wp-config.php, it’ll be dependent on your site’s theme.
// Use X-Forwarded-For HTTP Header to Get Visitor’s Real IP Address
if ( isset( $_SERVER[‘HTTP_X_FORWARDED_FOR’] ) ) {
$http_x_headers = explode( ‘,’, $_SERVER[‘HTTP_X_FORWARDED_FOR’] );

$_SERVER[‘REMOTE_ADDR’] = $http_x_headers[0];
}
6. Authenticate Manually With Your Host
When you’ve integrated your site to Ezoic, all traffic requests from them will be seen by your host as ‘x-middleton-ip’ under the request header. This particular header is Ezoic’s way of passing along the exact IP addresses of your users. You can try contacting your host and explain to them where they could find this traffic request header. At which point, they could find the IP addresses there.
This will be different from the usual ‘requested-by’ header, which would get you incorrectly flagged by their systems as deriving traffic from bots. Unfortunately, negotiating with your host could be a bit tricky, especially if you’re using shared hosting. This is especially the case if you’re using a more budget hosting setup. These companies use tech that isn’t often compatible with Ezoic’s proxies.
If you’re stuck with a host that isn’t compatible, Ezoic has a free WordPress hosting service. This is only suitable for smaller sites with lower traffic, and it’s not really the best. But, it’s an option that you can consider if you need time to work things out, and port your site over to Ezoic. Or, it might come time for you to consider moving over to a new host that’s friendlier with Ezoic’s systems.
Further Notes
Cloudflare – Disable Rocket Loader – Turn caching level to bypass – ensure cache everything page rules aren’t enabled.
Caching Plugins – Disable all WordPress caching plugins – such as WP Rocket, W3 Total Cache, WP Super Cache , WP Fastest Cache, LiteSpeed, Swift Performance Cache, SG Optimizer etc.