Switching ad providers is no easy task, we get you. There are countless hurdles to get across, starting all the way from the hassle of integrating your site with them. Not to mention the hours spent setting up your ad placeholders, playing around with the configurations, and getting stuff to work right. Even on the best of occasions, this migration process will take days, which isn’t so easy if you’re busy.
Every minute and pageview counts, especially when online advertising and monetization are concerned. Thankfully, setting things up on Ezoic is pretty seamless, for the most part. If you’ve been around here for a while, then you’ll know how well Ezoic’s served us thus far. Are you thinking about making the switch from your current ad provider? Or, are you already signing up, but don’t know what comes next?
Well, we’re here to provide a step-by-step guide on how to get started with Ezoic. We’ll cover some of the basics from square one, and lead into how to get Ezoic’s ads running on your site. Additionally, we’ll be taking a look into how Ezoic really works, and provide a few tips and tricks on how to get the best out of Ezoic. So, here goes…
Step 0 – Signing Up For Ezoic
The first step would be to get your account on Ezoic opened. Mostly, this revolves around providing an email address, domain name, and so forth. If you’re interested in signing up to make the most out of monetization on your site, you can use our affiliate link here. Once you’ve signed up, you can leverage some of the perks and initiatives that Ezoic offers to publishers to help accelerate their site’s growth.

For instance, you could request (with your account manager) to take part in Ezoic’s revenue guarantee program. Here, Ezoic promises that you’ll earn at least 25% more in ad revenue compared to its rivals within 30 days. If not, Ezoic will pay the difference and 25% more on top of that. You can read our overview of Ezoic’s 25% revenue guarantee program to get acquainted with the terms and conditions.
But what if you’re a smaller publisher… Can you sign up with Ezoic? Of course! Ezoic’s Access Now is a specially-made program for publishers with fewer than 10,000 monthly visits to their site. It’s a great way for smaller and upstart sites to grow and have access to the same tools and services as the larger publications. From here on out, proceed with the on-screen registration and sign-up prompts.
Step 1 – Integrating Your Site With Ezoic
Once you’ve already registered for an account with Ezoic, you’ll be logged into the dashboard. As you don’t yet have any monetization set up for your site, the main page on the dashboard shows a handy ‘Get Started Today’ window. This should help you in keeping track of the key steps to get started with configuring Ezoic and monetizing with them. You’ll see these 5 steps outlined (and what they mean):
- Integrate Your Site – This is where you’ll link up your site to Ezoic’s servers to deliver and manage ads.
- Setup Ad Testing – Here, you’ll be placing and testing how ads appear on your site.
- Apply For Google’s Ad Exchange – Since Ezoic sources its ads from Google, you’ll need to have your site verified with Google beforehand before ads can show up.
- Turn On Site Speed – It’s their way of calling on Ezoic’s Leap service, which is a website speed optimization tool to help speed up load times and tweak the user interface.
- Turn On Ezoic – Last but not least, this process revolves around turning on monetization for ads to start appearing on your site.
First and foremost, we’ll be taking a look at integrating your site with Ezoic. To thoroughly leverage its services, and in layman’s terms, you’ll need to send all your traffic over through Ezoic. This way, you’d be able to embed ads on your site and earn through monetization as folks start viewing those ads. This is a crucial step to getting started with Ezoic. You can integrate your site with Ezoic in one of 3 methods:
A) Cloudflare Integration
The first and most recommended method for integrating your site with Ezoic is through Cloudflare. It’s the best option, given how easy, reliable, and speedy it is. For a Cloudflare-based integration process, all you need to do is log in with your Cloudflare account, before then connecting it with Ezoic.

This option is made available during the initial registration process, as Ezoic will see if your domain is set up with Cloudflare’s CDN. If so, and once you enter your Cloudflare credentials, you’ll be granting Ezoic access to your Cloudflare DNS. This might take a bit of time, usually a few hours or so (up to 24 hours).
This is where Ezoic will re-configure the Cloudflare DNS and then propagate across the internet and point all site traffic towards Ezoic’s CDN (content delivery network). It shouldn’t be too long before a green tab appears within the set-up menu, showing that your site’s Cloudflare DNS is now integrated with Ezoic’s CDN.
Note: If you have issues with this, I have two tips for you.
- In Cloudflare turn off ‘Bot Fight Mode’ in the firewall section.
- In Cloudflare and any other firewalls you are running create a whitelist of all Ezoic IPs and allow them access. Here is some information on how to white lists Ezoic’s IPs. Also, this is the current list of IP addresses.
B) Integration Via Name Servers
If your site isn’t running on Cloudflare’s DNS, you could instead opt to directly integrate Ezoic through your name servers. Consequently, you’re allowing Ezoic to act as a proxy network, optimizing a webpage to its best for optimal user experience, in addition to allowing you to embed ads on your site.
For a name server-based integration, Ezoic will generate new name servers that you can link back to Ezoic. Simply, you’re copying and pasting the custom, generated names to your site’s domain registrar. For a step-by-step process, you’ll have to:
- Log into your Ezoic account, head into the dashboard, and click on the Integrate Your Site tab.
- Among the visible options, click on Cloud Integration to link up your site to Ezoic with name servers.
- A table pops up, with two columns. On the left, you’ll see your existing name servers. Meanwhile, the right column shows the name servers that Ezoic has generated for your site to be integrated.
- Next, simply copy over the new generated name servers from Ezoic, and update your site’s registrar or host.
- Due to DNS propagation, it might take up to 24 hours for this integration to complete.

Whether you’re linking up your site to Ezoic directly with name servers or through Cloudflare, any form of DNS-based integration is highly recommended. It’ll ensure a speedy, reliable, and secure connection between your site and Ezoic. Plus, you’ll get access to additional server-side configuration options.
C) WordPress Plugin
This other alternative isn’t the most optimal as far as integration is concerned. The first is to use Ezoic’s WordPress plugin. We highly suggest that you avoid using their plugin for integration, as it does impact performance quite a bit and has severe limitations as to what you can configure.
Although, you will need this plugin later on anyways. This is to access a myriad of optimization options to boost your site’s load times, or even manage the ads. But for any form of integration, it’s best to go and set up a cloud-based process, instead. Either through your name servers or with Cloudflare.
Step 2 – Turn On Monetisation
When this is all done, you can head back to the Ezoic dashboard. Here, you should find a large button that says ‘Enable Monetisation’. Turn this on, and Ezoic would begin monetizing ads on your site. But, there’s more to be done first, such as setting up the ads and testing to make sure they work right.
Step 3 – Setting Up And Testing The Ads (Automated)
With your site now linked and integrated to Ezoic, it’s time to turn on monetization and sort out those ads. The best route to do this is by installing the aforementioned WordPress plugin. From there, you’d be able to set up ads, which is much easier than earlier workarounds of relying on third-party services.
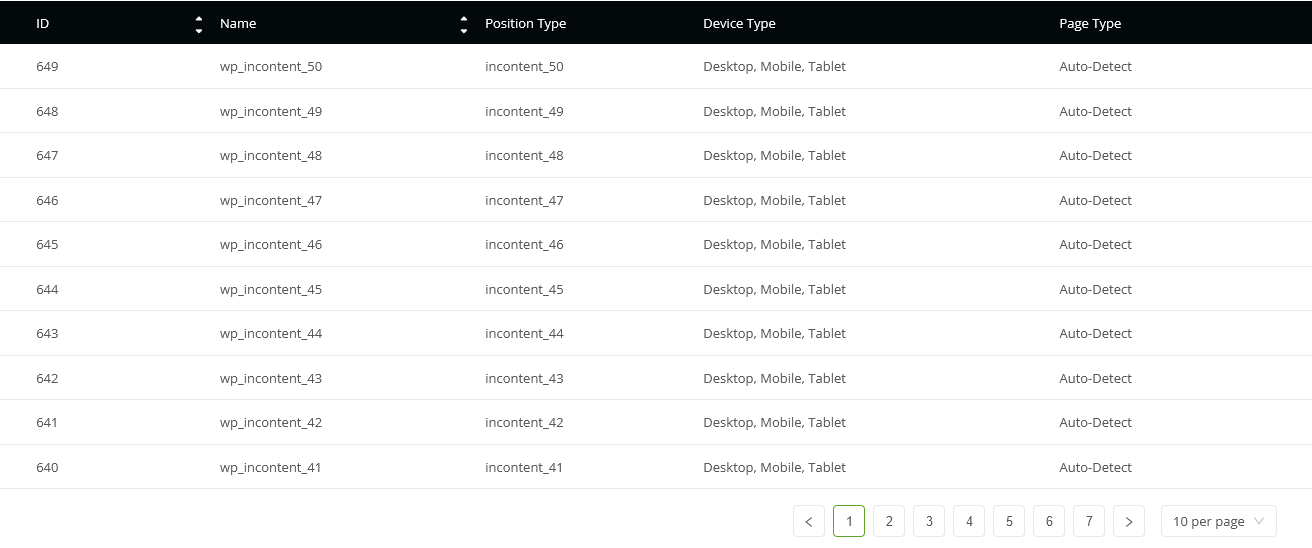
When you start out, Ezoic will automatically create a bunch of ad placeholders. But, you could remove or add more placeholders manually if you see fit. For example, you could set it so that Ezoic will show an ad every few paragraphs, show an ad underneath a heading, or so on, and make minute changes.
There are thousands (sometimes millions) of potential combinations, as Ezoic could show up to 100 of these ad placeholders within one page. The ads are usually assorted by their respective:
- Size, and how large each ad banner would appear, as well as their orientation (landscape or portrait).
- Quantity, and how many ad placeholders there are at a time within a page.
- Location or placement inside a page, such as in-between paragraphs, on the sidebars of the page, within the header or footer of a page, and so on.
- Type, concerning what type of ads are to be shown (static images, animations, interactive ads, etc.), and the subject matter covered in those ads.
Step 3.1 – How Should You Configure The Ad Placeholders?
Alternatively, you could create those placeholders within the Ezoic dashboard. Equally, there are quite a lot of options that you can change. For example, you may set the alignment or sizing. And, you could keep adding as many ad placeholders as you want to maximize the density (more on that later).
These options can be configured by specific devices. Hence, you could set them for desktop, tablet or mobile-based browsers. Since Ezoic’s AI will ultimately decide the best sizing and location of every ad banner automatically regardless of your input, you may as well tick all the relevant ad sizes possible.
The more ads you include, the more of it will feed into Ezoic’s AI and machine learning to test as well as tinker around with. Remember that any placeholder you set, and no matter how many there are, it won’t necessarily mean that ads will appear where you’ve placed the banners/spots at.
These are merely suggestions for Ezoic’s AI to understand where you’d prefer ads to show up, and experiment with numerous combinations to suit your preferences. While at the same time, manage the ad placements as much as it can to boost your ad revenue. So, keep adding as many as you so choose.
Here’s a quick how-to for creating new ad placeholders:
Step 3.2 – How To Create New Ad Placeholders? (Manualy)
- In the Monetisation page of the Ezoic dashboard, head to the Ad Placeholders section underneath Ad Tester.
- In the left-hand drop-down menu, select what type of ad placeholder you’d like to use.
- Then, click on the green ‘New Placeholder’ button to create that placeholder.
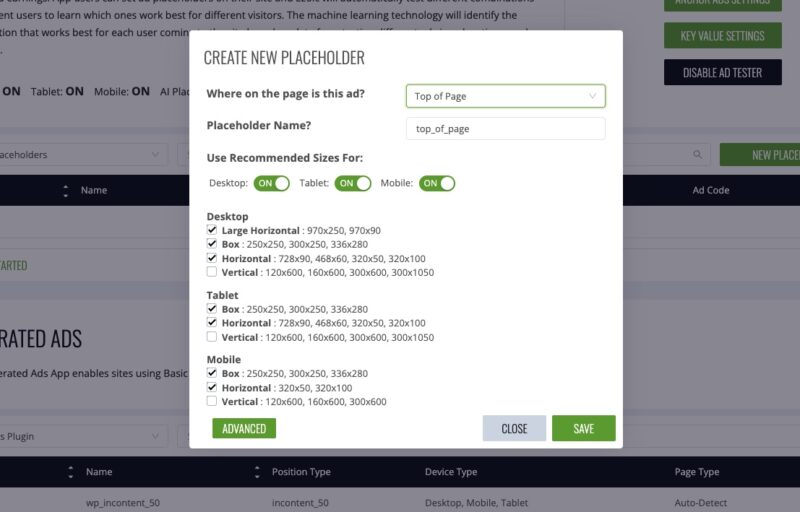
- A pop-up window will appear, where you can configure the placeholder.
- Start by setting the position of the placeholder (sidebar, top of the page, under the first paragraph, the bottom of the page, etc.). This lets Ezoic’s AI know where the placeholders are located and adjust it accordingly in relation to this.
- Then, designate a name to keep track of your placeholders, and their locations. Ezoic also recommends that you create at least one of each position type.
- Now, select which devices (i.e. browsers for desktops, tablets, or phones) would this placeholder (with your preferences as to its sizing and location) appear on.
- When that’s done, you’ll have to assign specific pages where this placeholder would appear. Ezoic’s Ad Tester software will then automatically recreate the same placeholders on similar pages on your site.
- There are even more settings to tinker with, this time concerning the sizes of the ads. By now, Ezoic’s Ad Tester has more or less figured out where to place the ads. As such, it’s confirming with you as to the sizes of the banner that you’d like Ezoic to test for a certain placeholder.
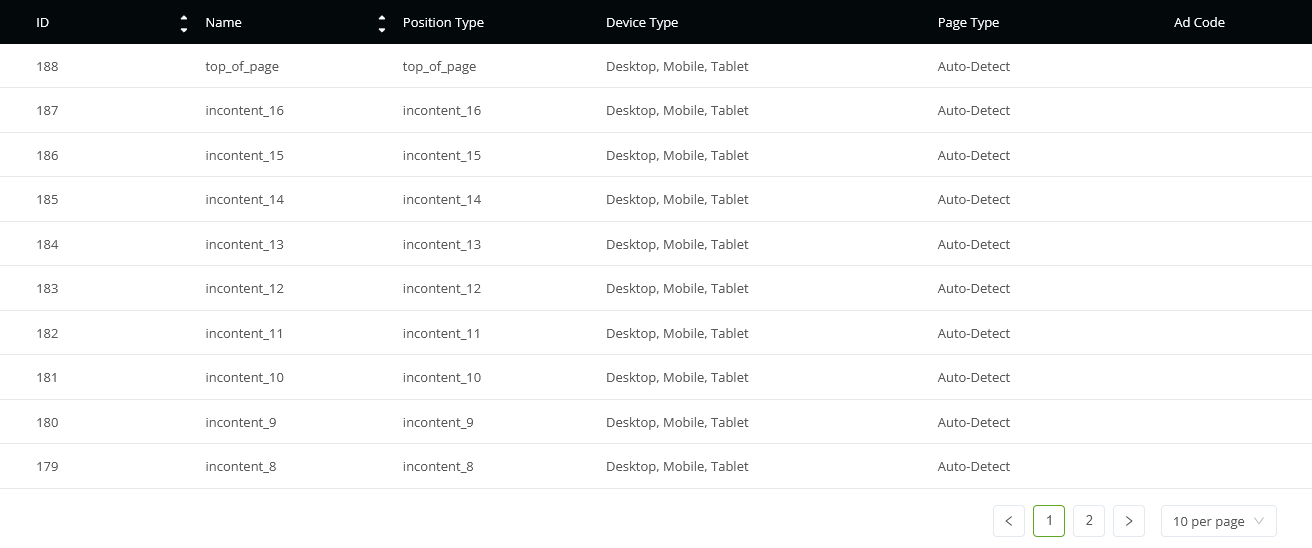
- Once you’re satisfied with this placeholder, you can keep creating as many as you want. If you’re now ready to start monetizing, copy the Ad Code by clicking on the ‘</>‘ button, and then paste it onto your site.
- That’s how you create just one placeholder. Now, you can keep repeating this process until you have an entire collection of placeholders.
Step 3.3 – What Else Should You Do?
Besides setting up the ad placeholders, there’s more which you can do here. For starters, this same page for Monetisation on the Ezoic dashboard is where you’ll wrap your site’s existing ad placements. This is assuming you have any prior to switching to Ezoic, such as those from a different ad provider.
To wrap ads and power them with Ezoic, you’ll need to:
- Head to the Monetisation page on the Ezoic dashboard, and click on ‘New Placeholder’.
- Then, configure the placeholder as we’ve discussed earlier (location, sizing, density, type, which pages the ads appear on, etc.).
- Once you’re done configuring, click on ‘Save’ to generate an Ad Code from Ezoic.
- Now, head over to the tool you used to embed ads onto your site.
- With that Ad Code in mind, it should appear something along the lines of, <div id=”ezoic-pub-ad-placeholder-148″> </div>
- All you need to do then is split this into two halves, with <div id=”ezoic-pub-ad-placeholder-148″> placed as the opening script ahead of your current ad placeholder. Meanwhile, the </div> will act as a closing script and should be paste it below your current ad placeholder.
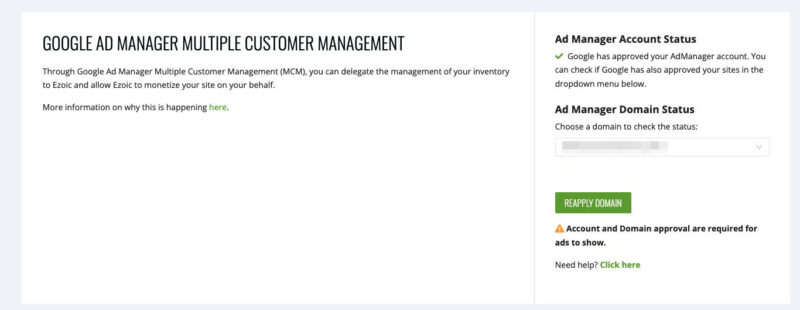
Step 4 – Apply For Google’s Ad Exchange
Before Ezoic is able to let you earn money from monetizing ads on your publication, you’ll first have to apply for an account at Google’s Ad Exchange. This is Google’s premier marketplace for premium ads, which is where Ezoic sources its advertisements. Note, Ezoic is a certified publishing partner of Google.
Therefore, you’ll have to get access to Google in addition to the other ad networks that Ezoic works with. Aside from granting you access to their ads, this process inherently opens up ads on your site to be bid on for selected spots. You might be asked to log into your Google Account to complete this.

Step 5 – Make Sure Your Ads.txt File Is Up To Date
Moving on, the next step would be double-checking that your site’s ads.txt file is up to date. If you’ve integrated your site through the Cloud (i.e. direct linking with a name server DNS or Cloudflare), your site’s ads.txt file should be detected automatically. This way, any updates are done on the spot.
But just in case, it’s worth making sure. This will be necessary for Ezoic to add information on all their partners on that file so that Ezoic can serve ads on your site on their behalf. This process can take a bit of time, roughly 12 to 24 hours. During this time, it’ll be cached to Google.
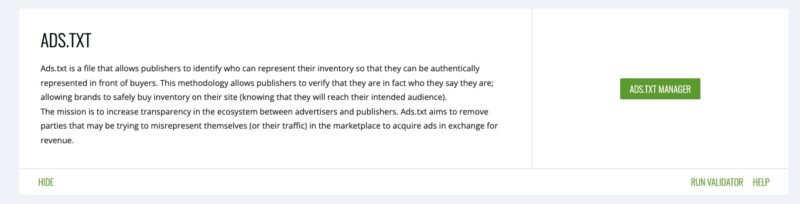
Ezoic also has a manual review and approval process that you’ll have to go through, as well. Once it’s all good, they’ll contact you once you’re site’s been greenlit for monetization. But what if the ads.txt file isn’t set properly or you never had one in the first place? In that case, you’ll need to create one from scratch.
Step 6 – Configuring The Privacy Policy And Consent Management
The following step in getting started with Ezoic will be to set up your site’s privacy policy and consent management. This is important, as Google has stopped serving ads on sites that don’t display privacy policy statements, or show a pop-up asking for your consent on data collection and handling.
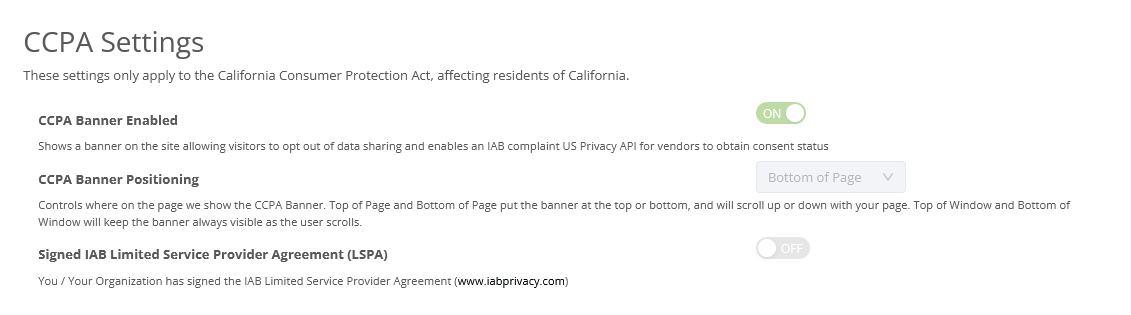
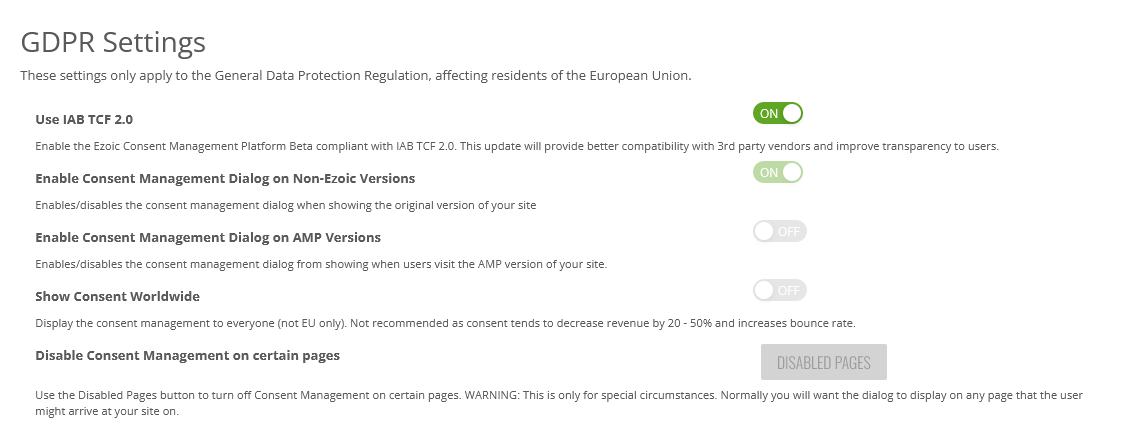
For those publications that fall under GDPR or CCPA regulation, it’s a good idea to have this sorted out before you go any further. The Ezoic dashboard enables you to customize the appearance of the pop-up consent windows. Plus, the ability to link out to third-party privacy policies (or create your own).
Step 7 – Turn On Ezoic’s Ad Tester
This is where you’ll get to see Ezoic’s clever AI and machine learning algorithms at work. In the Ezoic dashboard’s Monetisation page, look at the top-most section to find their ‘Ad Tester’. Then, click on ‘General Settings’ to begin monetizing those ad placeholders that you’ve set up on your site.
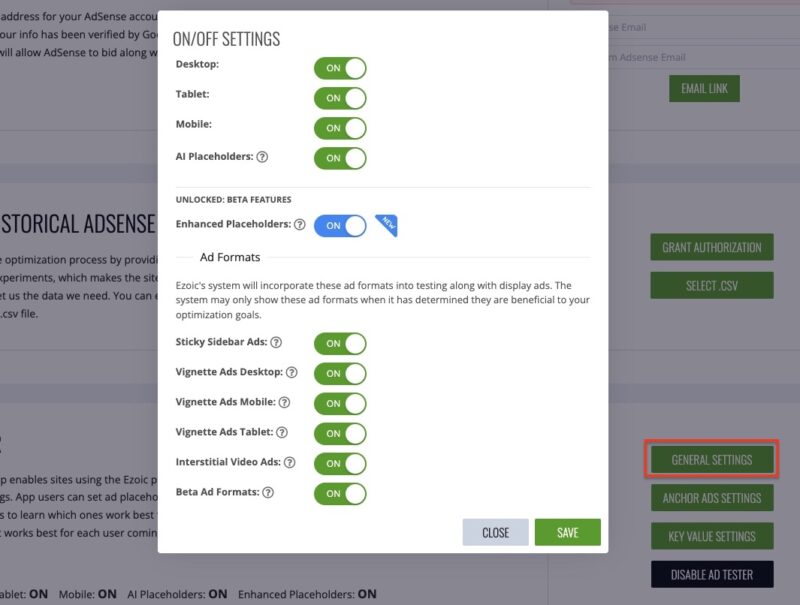 At this point, Ezoic’s AI will automatically vary the placement, density, sizing, and type of ads based on the placeholder parameters that you set earlier. In practice, it’ll differ on a visitor-by-visitor basis, as one site visitor might see fewer or more ads compared to another visitor.
Additionally, the location, sizing, as well as type of ads will be different, as well. This is part of Ezoic’s aim to enhance user engagement with their ads, and tailor the user experience more efficiently. To you, this means regularly accruing higher ad revenue from Ezoic compared to its rivals.
I would consider turning on all of the beta ad options here. This will give Ezoic more options to show ads and earn you more money.
You may notice higher interaction or click-through for the ads, too. Besides that, you could select how much traffic you’d like to pass through (or “throttle”) Ezoic’s. For example, you could have 50% of your site’s traffic being monetized through Ezoic. And, the other 50% from a different ad provider.
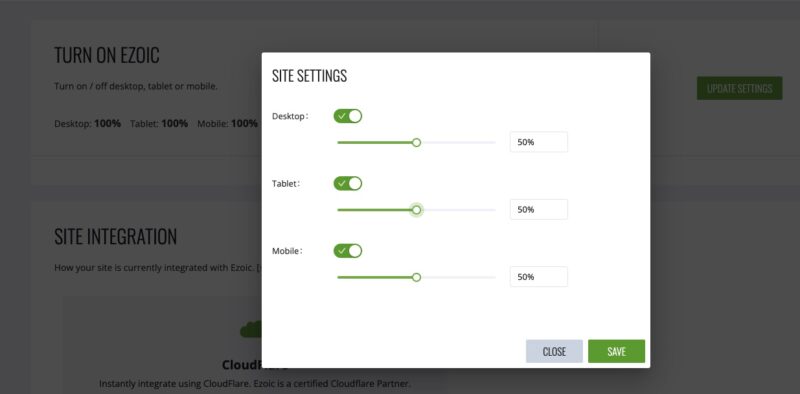
Once again, this could be configured per device (browsers on the desktop, tablet, or mobile). The key reason why this setting exists is for Ezoic’s split-testing feature. Here, you can fairly compare how its ads perform with your site’s existing ad provider (a competitor, if you have any).
Step 8 – The Waiting Game
Last but not least, you’ll have to wait 12 weeks or thereabouts for Ezoic to really start raking in those sweet returns from the ads. Speaking of its AI from the earlier step, it’s worth mentioning that Ezoic’s ad system will continually learn from user behavior for each visitor that comes to your site.
This then feeds into its machine learning processing. It’ll note how visitors interact with the ads and will begin further on-the-fly adjustments for the placeholders. In other words, Ezoic will periodically tweak itself to perform better over time, such as varying how ads show up on a page.
For example, it may show fewer ads for a particular visitor. This may be due to Ezoic’s AI realizing that they’d quickly scroll past. Or, perhaps they’re not too bothered with the ads. It’s practically an automated trial and error. As time passes, Ezoic’s AI and machine learning processes will understand what works, and what doesn’t.
As a whole, this generally takes around 12 weeks for the AI to properly get to grips with the optimum technique for displaying ads on your particular site. After which point, you’ll typically notice a much higher monetization rate (measured by EPMV or earnings per thousand visitors) than before.
And don’t worry you will be banking ad revenue all the way through this process, the next section explains how to get your cash out.
Step 9 – Set Up Your Payment Options
By Step 8, your site should already begin yielding ad revenue. Before the month ends, you should set up your payment options on how to get paid afterward. In our experience, we’d recommend using Payoneer. 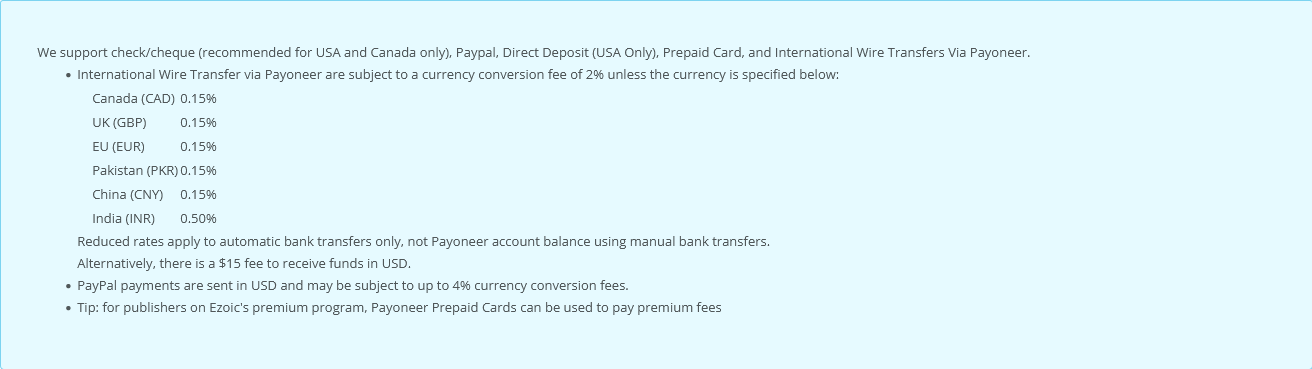
It’s the cheapest and simplest payment channel available. As of writing this, the same ease and low cost apply in the US, too. So, it’s worth looking into. Although, it’s best that you make a thorough comparison of whether or not a certain payment method is compatible with your bank.
On top of that, be sure to compare rates for possible currency exchanges. Or, perhaps fees to cover the cost of wire transfers or overseas remittance. These will all vary based on what region you’re based in, but in general, Ezoic supports a wide variety of payment options.
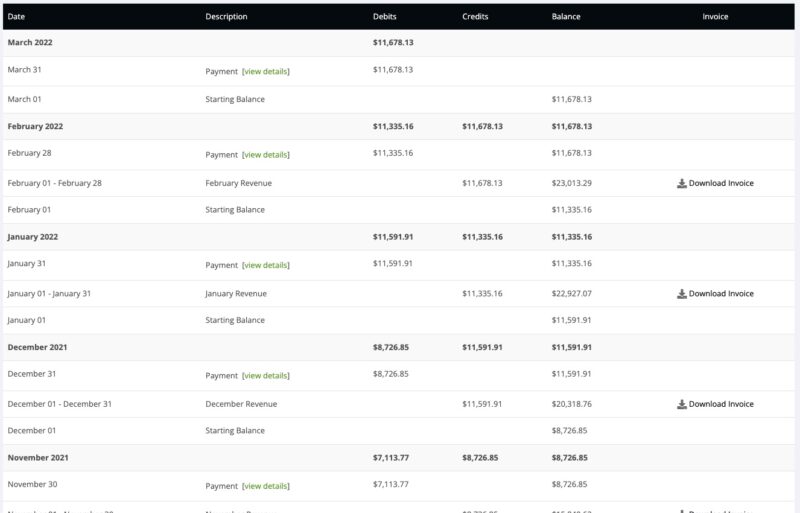
Ezoic Payment Terms – Just to let you know, you will earn ad revenue for a calendar month, then you will get paid that amount around 30 days later. Your Ezoic payments may look something like the below.